This week professor Joe Hupy gave the class the assignment of conducting a survey using the distance and azimuth method. The general idea of this surveying method is to find a base point. This base point can then be used to map out other features in relation to this base point using the distance and azimuth of each specific feature to the base point. This method is a low tech method that can be used when more advanced field equipment for mapping points is not working or simply isn't available. There could be bad weather, it could be too cold for the equipment to work, the equipment might get dropped or break, or the batteries might simply run out. As Joe said, "technology will fail you", and this method of surveying an area is a way to get around that. Finding the distance and azimuth of features from a base point can be done in several ways. The distance between features can be found using a distance measuring tool (Figure 1). The azimuth from a base point to a specific feature can be found by using a compass (Figure 2). Also, both the distance and azimuth from a base point to a specific feature can be found using a tool such as the TruPulse Laser (Figure 3). The TruPulse Laser is also what was used to discover and help record data in this field activity. All of these tools are made available to geography students at the University of Wisconsin-Eau Claire.
 |
| This is a Sonin Electronic Measuring Device and can be used to find the slope distance between one object and another. How it works is a laser is shot from the left device to the right device and it records the distance. In distance-azimuth surveying typically one person will go out and stand over the desired feature while another person "shoots" them with the laser and records the distance (Figure 1) |
 |
| This is a Suunto compass and can be used to find the azimuth of and object from where the user is standing. The user can look through the whole in the compass while it is pointing at the desired object to be recorded. In the whole, the user can see the azimuth of the direction the compass is being pointed in relation to the position the user is in. (Figure 2) |
 |
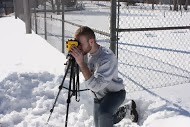
| The TruPulse laser is able to find both the slope distance and the azimuth from one position to another. A user can point it at an object using its magnified zoom and fire a laser at the object. This laser allows the TruPulse to detect the slope distance from the position of the laser and the azimuth in regards to the position of the laser. This device was used to record data in this weeks field activity. (Figure 3) |
After a brief demo on how to use the previously mentioned equipment, the class was grouped off and given instructions. The instructions involved finding an area around Eau Claire and gather a variety of point based data in a plot from a fourth of a hectare to a hectare. The point based data would have to be found using the distance-azimuth method and around at least 100 different points would need to be gathered with some type of attribute attached to them. After the data is gathered, it will be required to import the data into ArcMap in order to map out the various surveyed points.
Magnetic declination is one aspect of this problem the class was told to research on its own. Magnetic declination is the angle between magnetic north and true north as the Earth's magnetic field varies based on location and time. Using an NOAA declination calculator, it was found the the declination for Eau Claire at the time of the survey would only be about one degree west, this means that recorded data will be one degree less than true north, which is considerable low compared to other areas.
Methods:
Study Area:
The first step in beginning the survey was to determine what area would be studied. The group decided that Owen Park in Eau Claire would be an excellent location to conduct the survey. It is a walks distance away from campus and includes many features that can be surveyed such as trees and signs. In order to be prepared, the group wanted to determine the best place to set the base point beforehand. Joe Hupy advised the class the using a GPS to calculate the location of a base point would be inaccurate and would take awhile. He recommended simply finding an easily visible location from a satellite view and using this as the base point. The latitude and longitude of the base point can be found using ArcMap using this method. Knowing this and examining a satellite image of Owen Park, it was decided to place the base point on a corner of the tennis court fence (Figure 4). Points of view from this position can be seen in Figures 5-12.
 |
| This is a satellite image of the surveyed area in Owen Park. The base point for conducting the distance-azimuth survey was set at the corner of the tennis courts and is marked here with an orange dot. From here this position, the group was able to easily survey the surrounding landscape away from the tennis courts. (Figure 4) |
 |
| Figure 5 |
 |
| Figure 6 |
 |
| Figure 7 |
 |
| Figure 8 |
 |
| Figure 9 |
 |
| Figure 10 |
 |
| Figure 11 |
 |
| Figure 12 |
As can clearly be seen in Figures 5-12, when the landscape was surveyed it was considerably more snow-covered and wintry than the satellite image in Figure 4. This actually helped in the surveying as paths to tree trunks weren't obstructed by leaves and different features further away stood out well against the white snow background.
Surveying:
A TruPulse laser device set on a tripod was used to conduct the surveying (Figure 13, Figure 14). The group members took turns firing the laser at features and listing the slope distance, azimuth, and feature type (tree, trail sign, house, etc...); while another group member recorded the data that was listed off, recording the object ID #, feature type, slope distance in meters, and azimuth in decimal degrees. The data was methodically gathered, though luckily it was the warmest day in a month. An issue that was noticed with using the TruPulse laser was that, at larger distances, the slope distance value wouldn't have decimal places and would therefore lose some accuracy of measurement. Also, at times objects needed to be re-scanned due to measurements that seemed inaccurate. This could have been due to the difficulty in holding the TruPulse steady despite the tripod. After 98 points were gathered and recorded, the batteries on the TruPulse laser died proving Joe Hupy's previous statement that technology will fail. Thankfully 98 points was enough for this activity, though if the group had been conducting an actual field study and had come unprepared in case the batteries died, nothing could have been done about it.
 |
| Figure 13 |
 |
| Figure 14 |
The surveying was performed using a TruPulse laser which was able to find the slope distance of features and the azimuth of features from the set base point. A tripod was used to help hold the laser steady and minimize error. Thankfully, the weather was very cooperative on the day of surveying as temperatures reached 45 degrees Fahrenheit, something that hadn't happened for over a month. This helped make surveying easier and far more enjoyable.
Data Entry and Mapping:
The recorded data was then entered into an Excel spreadsheet (Figure 15) in order to import it into ArcMap.
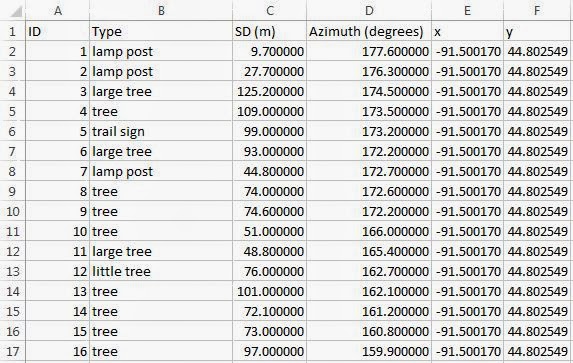 |
| The data that was recorded was entered into the Excel spreadsheet in four columns: ID, Type, SD (Standard Distance), and Azimuth. The "x" and "y" columns were added in order to run the "Bearing Distance to Line" tool in ArcMap. These two columns contain the latitude and longitude of the base point and are all the same as only one base point was used. The numbers are all extrapolated out to six decimal places and formatted as numbers in order to help more smoothly run tools in ArcMap as this was an issue that other groups had come up with in the past blogs (see FAQ). (Figure 15) |
Once ArcMap was open, the first step was to add a base map of Owen Park (Figure 16). Joe Hupy instructed the class not to use Google aerial images so a Bing aerial image was used.
 |
| This is the base map that was brought in thanks to ESRI. It covers the entire surveyed area and is ready to have data added to it. (Figure 16) |
The next step was to create a geodatabase in order to store data that would be created. Using folder connections and navigating to the appropriate folders a geodatabase titled dist_az was created specifically for this field activity to store data and help import the Excel spreadsheet. After this was accomplished, it was required to appropriately calculate the latitude and longitude of the base point in order to properly run all the tools that would be required in the next steps. To do this a point feature class was created in the dist_az geodatabase. A point was then placed, by editing, at the appropriate location on the base map (Figure 17). The point could then be viewed to find that the position of the base point was 44.802549 N and 91.500170 W (Figure 15).
 |
| This map shows the position of the base point for the distance-azimuth survey. It was digitized by creating a feature class and is represented as an orange dot and listed in the Legend as "Laser Site". Using this point, the group was able to find the latitude and longitude coordinates of the base point. Knowing this was extremely important as without it, all of the future data would be inaccurate. (Figure 17) |
Once the base point was set, the next step was to import the Excel spreadsheet. The spreadsheet was imported into the dist_az geodatabase. In order to find the locations of the surveyed features, the tool "Bearing Distance to Line" was used. This tool converted the listed distance and azimuth in the spreadsheet into a line feature class using an X-coordinate field (longitudinal location in decimal degrees of the base point), a Y-coordinate field (latitudinal location in decimal degrees of the base point), a bearing field (azimuth), and a distance field (slope distance) (Figure 18).
 |
| This map shows the base point and the resulting lines from the "Bearing Distance to Line" tool. These lines are more or less the lines of site that the TruPulse laser used to gather the data that was required. (Figure 18) |
However, these lines did not give the position of the surveyed features. The position of the surveyed features was actually at the end vertex of each line. There is a simple tool in ArcToolbox called "Feature Vertices to Points". This tool can take a line feature class and simply put points on the vertices as a new feature class. This is exactly what was needed in order to map out the surveyed features (Figure 19).
 |
| This map shows the locations of the surveyed features under the Legend as "Survey Points". These points were located using the "Feature Vertices to Points" tool, and it can be seen that the mapped points are all on the vertices of one of the lines. (Figure 19) |
The points on the map were fine, but they didn't properly represent the features that had been surveyed. These were just points, the data that had been surveyed contained feature type. In order to create a map with the feature type, a join was performed in ArcMap. This joined the "Surveyed Points" features with the original spreadsheet that was brought in. The join was based on the "Original ID" field and the "ID" field in the spreadsheet. This allowed a map more properly representing the different features to be created (Figure 20).
 |
| This is a final map of the surveyed features in the designated survey area in Owen Park. The base point is still represented by "Laser Site" in the legend, while all other points are symbolized by the type of feature they were deemed to be. The features that were unique in their feature type were grouped under "all other values", these include: bridge support, large white pole, portable toiled, garbage can, apartment sign, and bus stop. This map does show that there are some problems with the surveying that was performed, as it is unlikely a large tree was off shore in the Chippewa River. (Figure 20) |
Results/Discussion:
The problem with the location of the two features off of the Chippewa River bank (Figure 20) is an issue that should be addressed. It is likely that this issue occurred due to the features being so far away. While the TruPulse laser does feature a magnifying glass to better aim and shoot features further away, it seems that the further away a feature is, the more inaccurate of a reading the device gives. This could be due to user error, as it is hard to aim at such far objects and hold the laser steady, even with a tripod. It could also be in part due to the previously mentioned fact that at greater distances the TruPulse laser doesn't give the slope distance measurement out to the accuracy of decimal points, it only returns whole numbers. Knowing this, it may be best to only use the TruPulse to perform distance-azimuth surveying on close to medium objects, or at least objects under 100 meters away. A way to avoid this in the future would be to set up multiple base points far enough away from each other to insure that the objects that are too far away from one base point to get an actual reading are well within the limits of the other base point.
Other than the few points that were far away from the base point, most of the points appear to be accurate. The tree features are clumped in areas where it appears there are trees, and there are no random tree features in random empty areas that are very apparent. There were many features that were not surveyed due to there being an abundance of available features, a limited time, a limited requirement, and the batteries on the TruPulse dying.
In many ways the group was well prepared for this activity. Everyone was able to study up on what had occurred in previous attempts at this activity from old blogs. The equipment that was required (TruPulse, tripod, and camera) was all rented and brought to the survey site. A good base point in a high, open area with a good vantage point that was able to be seen from a satellite view was selected which enabled the mapping out of this point and the actual surveying with the laser to go smoothly. Though the team failed to bring spare batteries or back up surveying devices such as a compass (Figure 2) or a distance finder (Figure 1), enough features were already surveyed and recorded by the time the TruPulse died. The beautiful weather while surveying also helped keep spirits up and made the whole process enjoyable, as can be seen, not even gloves were needed (Figure 13).
The use of this data in ArcMap was rather limited as all that was recorded was feature type, and there isn't much that can be done in terms of analysis of feature type, especially considering most of the features were trees. However, bringing the data into ArcMap and creating a map of the features based on feature type (Figure 20) helps show that the survey was accurate for the most part as there are no random tree features in the residential area in locations close to medium distance away from the base point. However, there are a few mistakes as the data gets further away as mentioned before (house in a forested area and tree off shore).
Conclusion:
This method of surveying doesn't require a large amount of technology. All that's needed to perform a distance-azimuth survey at it's most basic level is a compass and some sort of measuring device, as long as the location of the base point is established. This activity took it one level higher and used a laser device to perform the survey. The activity taught the class how to properly perform the survey and be prepared for set-backs such as technology failing to occur when doing field work. In the future it'd be interesting to go out and use just the compass and a survey tape measure, instead of the TruPulse laser, to see how accurate of results can be obtained using a distance-azimuth survey.
No comments:
Post a Comment