Introduction:
The class went out to soccer fields near campus and the Eau Claire Indoor Sports Center to gather Unmanned Aerial Systems (UAS) imagery (the same location as in
Field Activity 7. The imagery was gathered by attaching two cameras to a large balloon (Figure 1). These cameras were set to take images at set intervals of every five seconds. One of the cameras collected the images and the geospatial information of the images as well, while the other just collected images. The balloon was walked around by the class to gather images of the soccer fields. From here the class was required to mosaic the images gathered by the cameras together in order to create a seamless complete image of the soccer field study area. Professor Joe Hupy instructed the class to explore some of the various software options to mosaic the images together. He also explained that some sort of freeware would need to be found in order to attach the geographic information to the geotagged images.
 |
| The balloon had two cameras attached to it and was walked around the study area by the class as the cameras took pictures at five second intervals. This is an inexpensive way to collect aerial imagery with little prior training. However, if there is any sort of wind, a kite may be a better option than the balloon. (Figure 1) |
Methods:
The class gathered at the soccer fields that were to be the study area. There was little wind and the cold had subsided for the day, it was near perfect weather to launch the balloon, though the wind did pick up later. The balloon was filled with helium (Figure 2) and raised up while two cameras were attached to the string. The cameras began taking images as the balloon was raised up. When at full height, the class was instructed to walk the area of the soccer fields with the balloon and allow the cameras to do the rest. Joe Hupy iterated that the course should be walked in a pattern that would ensure overlap of the images to aid in creating a 3D view of the area (Figure 3).
 |
| The balloon was filled with helium and allowed to float while the two cameras were attached to the string. One of the cameras was set to collect geotagged images. The class then walked around the fields bringing the balloon with them. (Figure 2) |
 |
| The track log of the balloon shows how the little bit of wind whipped it around as it was far away from the study area at some points and squiggled back and forth. Thankfully, enough images were gathered of the soccer fields in order to create a mosaicked image of the area. (Figure 3) |
Once an ideal amount of imagery was gathered it was required to mosaic it together to create the final seamless image. Two types of software that were recommended were
Pix4D and
PhotoScan. The class was told to explore these options. Drew Briski, a class member had some skills in PhotoScan and was able to help instruct the class as to how to mosaic the images together. Hundreds of images were taken, though if they were all chosen to perform the mosaic, it would have taken hours. Instead, for the purposes of learning, thirty-two high quality images taken in succession were chosen to best capture the soccer fields. The images were also chosen from the camera that had the geotagged data with it in order to avoid having to later georeference the output image. The program that was chosen to attach the spatial information was
GeoSetter, a freeware created to work with geodata such as the data that needed to be attached to the camera (Figure 4).
 |
| The images were uploaded into GeoSetter and then the geospatial information was added. As can be seen on the top right, the images were successfully placed in the correct location over the soccer fields. This means that the information would hopefully not need to be georeferenced. (Figure 4) |
Now that the images that were geotagged were ready to be uploaded into into PhotoScan and mosaicked together according to the process outlined by Drew Briski (Figures 5-8).
 |
| PhotoScan at first appears to be a rather difficult tool that isn't very user-friendly. However, if the right steps are taken, PhotoScan is extremely automated and mosaicking images is a matter of simply pressing buttons as it is extremely automated. (Figure 5) |
 |
| The images have been added by using the workflow tab and selecting align photos. This is a point cloud created from the images. (Figure 6) |
 |
| After a point cloud is created a mesh and texture can be built to help generate the 3D mosaicked image. (Figure 7) |
 |
| This is the final product as viewed in PhotoScan. It's hard to picture the image in real life though as it is oriented extremely strange. From here the orthophoto can be exported into a TIFF file to be viewed in ArcMap as a raster. (Figure 8) |
The TIFF of the image was then brought into ArcMap to view over a satellite image and compare to see how well the mosaic performed. However, it was clear that the image wasn't oriented correctly (Figure 9). The image would need to be georeferenced with the satellite image in order to come out correctly oriented (Figure 10).
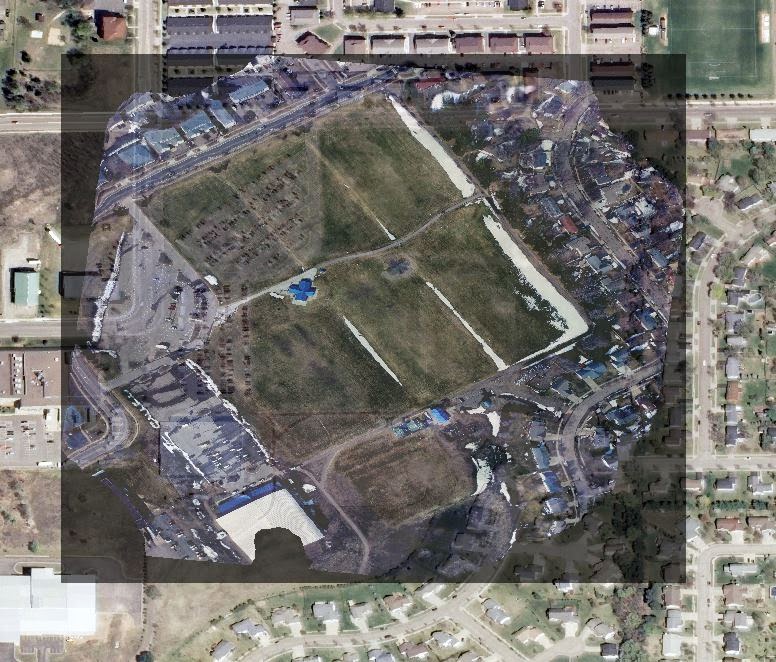 |
| When first brought into ArcMap and compared with the satellite imagery, it was clear that the image generated by mosaicking all of the captured images had some problems. There was some distortion and the image wasn't oriented correctly. (Figure 9) |
 |
| After georeferencing the image to the satellite imagery it appears that the image has come out correctly oriented and with minimal distortion. Six ground control points were used to georeference the image. (Figure 10) |
Discussion:
This process seemed rather daunting when first laid out to the class. Images were to be gathered using a previously unlearnt technique, then they were to be mosaicked together using a previously unknown software. This seemed quite difficult when first explained but it turned out to be a rather painless process. The gathering of the images using the balloon is not a difficult or expensive task and gathered a good deal of decent quality imagery. PhotoScan turned out to be rather user-friendly in part to Drew Briski providing a good deal of instruction as to how to use it. Finally, georeferencing the image was an easy process that had been covered before. It was however surprising that the image needed to be georeferenced considering it had geo-information attached to it already. Also, the output image is of an impressive quality considering only thirty two of the hundreds of images were used to create it.
Conclusion:
This activity was a good way to teach the class that using UAS to gather images isn't as daunting as it would originally seem. Some minor training and attention to details can be put together to put together high quality aerial imagery. Even using the balloon in this case showed that good aerial imagery in a third dimension can be gathered using the simplest of tools, two normal cameras and a balloon. The use of GeoSetter also showed that the industry is moving more towards freeware, making this whole process much more accessible.
No comments:
Post a Comment